Monday, December 23, 2013

PHOTO TO FRAME

I have been having way too much fun taking pictures with the cutest model in the world! 
I am still learning everything there is to know about photography and having a riot while I am doing it.
Here is some picture inspiration for you today.


In Photoshop I re-sized the images and placed them all on one canvas. I then ran a filter in a sepia tone. Using the Color Picker, I selected a color from one of the dark stripes to use for the background image. I love the sequence of these 3 pictures. They would look darling in a frame, but until I get around to doing that, I have this image.


Wednesday, December 4, 2013

PHOTO TO FRAME

BABY'S FIRST CHRISTMAS

Pictures like this have been all over Pinterest lately. I thought I would take the leap and take my camera off Auto and give it a shot! I really love how they turned out. 

I hope you enjoy!


Tuesday, October 1, 2013

FALL


It's October! Fall is upon us. Yesterday I felt the crisp cool breeze and was happy to know fall was on it's way. Life has been a storm lately. Making it through summer, getting my husband back in school for his last semester, and tons of other responsibilities have kept me away from blog-land.

But as I am taking the first day of October as a metaphor to the first day of a fresh start for me I wanted to share with you tidbits from around my home. I spruced up my home and love the inspiration I see, reminding me of my new start.

Tuesday, August 20, 2013

MAKE YOUR OWN BABY FOOD

Before I ever had a baby I really really wanted a Baby Bullet Blender to make baby food. I think I was more excited about that than actually having a baby... (alright that's not true! But pretty close.) So I wanted to share with you what I have figured out when making your own baby food. I have found that all it takes is spending about 40 minutes once a week, so if you were worried about the time commitment that should ease your mind. Ok let's get started.

When to start solid foods:


At 3 months old I began adding about a tablespoon of rice grain mush to my baby's bottle. He really seemed to enjoy being more full. I did notice that it took him a lot longer to get through his bottles so I upgraded to a bottle nipple with a higher flow.

At 4 months old I started solid foods. Since my baby was already used to rice grain cereal I started with that. The whole first week he had rice cereal for his meal one time per day.

Try to introduce solid foods slowly. I chose to only introduce one new food each week to make sure my baby didn't have any allergies.

What foods to start with:

When starting solid foods you want to begin with really easy to digest vegetables. At month 4 my baby really enjoyed butternut squash, sweet potato and bananas. Around 5 months I added zucchini to his diet.

Preparing the vegetables:

I am going to show you how I prepared 2 weeks worth of sweet potato and zucchini in about an hour. You will get about 2 weeks of baby food from 1 large zucchini and 2 sweet potatoes. First, wash and peel the vegetables. Cut into small cubes and place in an oven safe dish. Add water to almost fill the dish.


 Cooking the vegetables:

Preheat your oven to 350* and bake for 40 minutes. This gets the veggies all nice and soft to go through your blender. When they are done cooking, let them sit for about 15 minutes.


Puree:

When it has cooled, place place the chunks into your blender. Any kind of blender, Cuisinart,or baby blender will work great! When pureeing sweet potato add about 1/2 cup of water. Blend until the mixture has become a very soft, smooth puree,without any large chunks.


Storing:

You want to be more careful how you store your home-made baby food than store bought because it doesn't have the same preservatives. In the refrigerator it will last about 4-6 days. When you package it up to store it you want to keep that in mind. I store 6 small containers in the refrigerator and freeze the rest. This is how much food I was able to make.


Tuesday, August 13, 2013

BABIES & BALLOONS


How cute is this little 5 month old boy? He was definitely playing it up for the camera.


The Sandy Hot Air Balloon Festival seems to be a gathering point for local photographers. I was surprised to see so many people that looked like they knew what they were doing! I definitely felt out of the loop :) There was also a Nikon rep there to answer any questions, and they let you check out a camera to take some shots. Next year I'm going to be ready to stay later and take lots of pictures!


Holden is lifting his head up really well now! He loves being outside and really liked the bright colors of the hot air balloons.


Monday, July 29, 2013

PHOTO TO FRAME


So I've been photo editing like crazy! I am way behind on scrapbooking, well "behind" is a bit of an overstatement. More like I have never even started one. So I am gathering all the pictures I have from when my husband and I started dating to now. It's a really big project, but it has been fun to look back over the last couple of years. I have also been editing pictures and wanted to share a couple of my favorites!


I saw these cute ideas on Pinterest and wanted to do my own versions. It was really fun except for the fact that I hate being photographed! I made my husband take A TON of pictures so I could pick out the ones I thought turned out :) The hardest part about having your husband take your pictures is that he always thinks you look much cuter than you actually do. It is a sweet compliment actually, but at the same time it is almost horrifying to look at the pictures of you he thought were cute! 

I used basically the same (very simple) steps in Photoshop on these pictures:
1. Create a canvas size the size of the final image that you want (I chose 4"x 6" because I want to scrapbook with these images.) 
2. Then divide the canvas into 2 or 3 equal sections and crop your original images to this size.
3. You can then drag the images onto your 4x6 canvas without too much difficulty.
4. I then merged the layers and ran a black and white filter over the complete image, by merging the layers it will create a more cohesive look than changing each image to black and white and then moving it.
5. On the bottom image I added the text "20 Weeks" to represent 20 weeks in the womb and 20 weeks after birth.


I was so happy to catch Holden in almost exactly the same position as his ultrasound picture! What a cutie :) If any of you have done a photo like this feel free to post a link, I would LOVE to see it!


Tuesday, July 23, 2013

DIY BIRD MOBILE


I am so excited to share how I made this fun and whimsical mobile! It is simple and easy to make and can add pizzazz to any nursery. I have also seen people use the bird pattern for other crafts (I made Christmas ornaments for my tree a few years ago...) My son loves staring at the bright colors and patterns that I chose for his mobile. (Most of the fabrics I used were scraps, so it's also a thrifty project!) If you're ready then I'm ready! Let's get started.

Supplies:

scissors
pins
loads of fun fabric
needle
thread
embroidery hoop
fishing line
yarn

Birds


The pattern for the birds is from a website that is no longer up and running. I don't have a way to post a pdf, because I am not that good at computers! But if you would like a copy of the pattern below leave a comment with your email and I will send it to you :)


First you need to cut and match the 2 pieces of your bird together. This is the creative part! Don't be afraid to get a little bit crazy mixing colors and patterns. Babies love to look at bold colors and contrasting patterns.


Pin 1 edge of the belly to the body, right sides together, starting at the tail.


Using a 1/4" seam allowance, sew the two pieces together from one dot to the next. Make sure you do not sew the tail closed. Repeat for the other edge.


Sew head together from belly to dot.

Turn the bird right side out and stuff.


Sew the tail closed. Your first bird is finished!

Mobile

Turning the birds into a mobile takes some planning and trial and error. This is the way I came up with, but I am sure it is neither the best or easiest way!

I began by threading fishing line through the top of the head of the bird and securing with a knot. After doing this with all 10 birds I tied the other end of the fishing line to the embroidery hoops to hang at various levels. I used 2 embroidery hoops, but it would have been just as cute with one. I also had to attach the hoops together with string. After the birds were all attached I wrapped the hoops with yarn to give it some color. When that was finished the final step was hanging. I ordered a mobile arm with a clamp from Buy Buy Baby for about $10.

Add your baby and ta-da! Finished!


Tuesday, July 16, 2013

HOW TO PLAN AND BUILD A NURSERY (WITHOUT BREAKING THE BANK!)


We live in a very material world. We are continuously bombarded by images from commercials, advertisements and t.v. sitcoms that tell us that feeling special comes from spending money, buying the lastest and greatest products, and owning much more than we need. Planning my nursery I often felt slightly cheated that I couldn't SHOULDN'T go out and purchase a brand new everything.

I decided on three easy guidelines to create the nursery of my dreams without spending loads and loads of money.


1. Look for used furniture. Furniture is the largest (and most expensive) items that go in a nursery and they can be pricey! While being necessary it is not necessary to spend a fortune. I purchased a used crib from KSL.com for $30. To make it more special I painted it gray and distressed the edges. I spent a total of about $50 when you add in the spray paint. Compare that to the baby store! Other furniture items I found used (and for free) are the changing table, nightstand and glider. I bought baskets for the changing table, fixed up the nightstand with paint and new hardware and completely redid the glider, but all for a fraction of the cost.

2. DIY whatever you can. DIY-ing takes energy. Sometimes you are just not in the mood. But overall I feel like you can get an incredible sense of accomplishment by adding these elements to your room. Some of the items I chose to DIY were the crib bedding (minus the crib sheet), the bird mobile, and a hand-stamped curtain. I had a lot of fun doing this and it is easy to create a one-of-a-kind, special feeling in a room if you are willing to get creative!

3. Purchase only a few small items. I like to treat shopping as an activity. I can fill a whole day by tripping down to a special store to look for a small item. I treated myself to a darling patterned crib sheet from PB Kids. Not only was it fun to head down-town with my mother-in-law, grab some lunch and check out a few stores, but I felt very special getting to pick out something from PB Kids and take it home to my house! By picking small items to buy you can get the same feeling of taking home a whole new nursery without your wallet feeling like you did.

Friday, April 5, 2013

HOLDEN'S BIRTH STORY

Holden Curtis Ence, Lindsay Wright Photography
http://www.lindsaywrightphotography.com/blog/?p=6314


Thursday March 7, 2013

After having contractions for weeks and weeks I was getting to that final point of pregnancy where you can hardly take it anymore! My due date was March 10, but I was ready to have the little guy get here as soon as he could. Thursday night came around and my contractions started getting much closer together. As I got more and more uncomfortable I started craving cookies of all things! I remember standing in the shower crying because I wanted cookies soooo bad! (Yes you get pretty crazy when you are pregnant.) After Justin ran to the grocery store and brought back multiple types of cookies I felt a little better and could think more clearly. When my contractions were coming about 7 minutes apart we decided to hit the hospital!

We were in the hospital all night!  I was ready enough that they didn't want to send me home, but things weren't moving very fast. We waited out the whole night only to hear in the middle of the night that my contractions had stopped. Disappointing!

Friday March 8, 2013

My doctor, being the awesome guy that he is, decided to induce me on Friday morning. Justin and I were very relieved and excited that we would soon be meeting our baby boy! After hours and hours of labor we finally had our baby at 4:50 pm on Friday. It seems like such a miracle to me that after 9 months and 20 hours of labor a baby can arrive and be placed in your arms and be so absolutely perfect. 


Holden Curtis Ence was 7 lbs 15 oz and was 22 inches long. He looks so much like his daddy. He is 4 weeks old today and I can't believe how time flies!

He is a sweetheart, who loves being cuddled and sleeping. He sleeps most day and night, but we still have to get up to feed him. He loves having his head rubbed. He is very strong- he already lifts his head up by himself and kicks his long, skinny legs around. His feet and hands are very big, everyone says he will be very tall- we might have a little athlete on our hands.

Being a mommy to my little Holden is such a blessing. I can't imagine our family without him <3

Monday, February 25, 2013

MY LATEST PROJECT


My latest project has actually been going since December! But I finally had a chance to finish it today :) I made a photo book using all of my favorite pictures from the trip to Europe that Justin and I went on in May. My darling husband took me all around Europe for 10 days to celebrate my graduation. We had so much fun and got to see so many incredible sights. I especially enjoyed the art (that Italian Renaissance Art History course I took really paid off!) I hope you like it!

The new way to make a photo album: photo books by Shutterfly.

Friday, February 22, 2013

MATERNITY PHOTO SHOOT


Before I get to showing you my pictures here is a little back story. (By the way they turned out AMAZING! I am so excited.) I want to introduce you to one of my favorite people and great friends- Audrey, from ALL Photography. Audrey and I met at our Freshman Orientation for the College of Fine Arts at the University of Utah when we started in 2008 and have been friends ever since. Isn't this picture a gem! (I think I look a little like my brother Erik in this picture.) 


Audrey is an incredible photographer and graphic designer. Audrey is also one of the most creative and kind people I have ever met. She has her own company- ALL Photography and Design. Please check out her Facebook page by clicking here.

Now let's get to the pictures! I was so excited to do a photo shoot to remember how our little family of 2 1/2 looked. I was 35 weeks along at the time. There are so many photographs that turned out great but here are a few of my favorites. We did an outdoor shoot in American Fork and the lighting turned out perfect. I can't get over it!


And thanks so much to Audrey! I had so much fun working with her, and isn't her work fantastic??

Monday, February 11, 2013

TIME FOR AN UPDATE


Well it's February and it's been a little while since my last blog post. The biggest reason for this is that my husband and I just moved into our first home! (*Commence Cheering*) It's taken some time to land back on our feet and even begin to think about unpacking. The good news is that we love our house and are looking forward to meeting the baby boy coming our way. By the way, I am 36 weeks pregnant today (*Commence Cheering*), I feel like I am about to pop, I am starving all the time and am out of breath by the time I reach the top of the stairs. 

With Baby Boy (still without a name) coming soon, this month is all about nesting. I am feverishly working up a storm to have "everything" ready by the time the baby gets here. (I say "everything" because, let's face it, my to do list is much too long and unrealistic to actually accomplish, but a girl can dream right?) Anyway, this post is dedicated to a few projects that I have on my radar this month.
I will link you to some of my favorite Pinterest finds, and for others you will have to wait and be surprised with the finished product (don't worry, I'll make sure to make a tutorial)!

Ready. Here we go.

Easy Baby Blanket

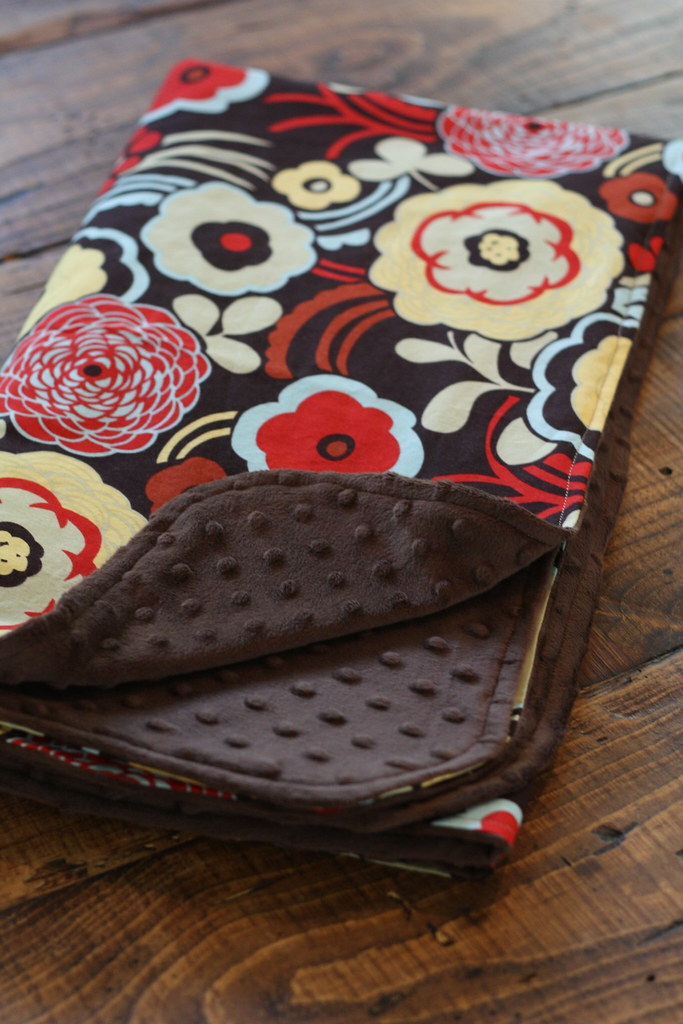
 This Minky baby blanket is perfect for cuddling and the tutorial from Greener Grass is incredibly easy to follow. I am making mine out of  the same fabric I used for the bumpers in the crib. (Pics coming later.)

IMG_0485 


Journal for Baby

This cute lady says that she starts a journal for each of her children as soon as she finds out she is expecting (or adopting) their child. I am a little late on that one, but I would love to start writing to Baby on the day of their birth. Then when they leave home, they have a beautiful story of their growing up and memories from their parents. 

Baby Mobile

Sorry no link, this one's a secret...


Lots and lots of burp cloths. There's no tutorial on this link, but her choices of fabric are great!


Hand-Stamped Curtains

I found a great Pottery Barn black-out curtain at Down East Homes, it was $20, but I know that sometimes means it could be stained or smudged or something. I decided to get it anyway because I have been wanting to try fabric stamping. I am looking forward to the finished product and will let you know how it goes! Here are links to some of the best instructions I have found thus far.

From Centsational Girl
and
From Unruly Things

Wishes for Baby

 I saw this on Pinterest awhile back, but can't find the link, sorry! I want to make cards like this to have at the hospital and at the house when people come visit. It will be a great way to always remember the first few days of Baby's life.

wishes for baby shower 


I am really looking forward to these projects and don't forget to check back in to see the finished product!

Friday, January 11, 2013

LIVING IN THE MOMENT

This year I have really decided to put in a special effort to not only achieve my New Year's Resolutions, but to continue making new resolutions throughout the whole year. My Happiness Project, as I've been calling it, comes from Gretchen Rubin's book, The Happiness Project. I have come up with a goal for each month of 2013. January's focus is to Live in the Moment. This also goes along with #1 of 10 Things I Want to do in 2013- Do One Thing Every Day That Makes You Happy.

Here's how I plan on doing it:

Get dressed! Being pregnant definitely makes me feel like lounging in sweats and no bra all day, but let's face it, that doesn't really make me feel the best. Like it or not, a well put together outfit and some fresh make-up can go a long way.

Walk with a purpose and keep your shoulders back. Not only does it make me feel happier, but I will look happier on the outside too.

Take a bubble bath.

Take time to make something with your hands. I get so much satisfaction from seeing something that I made get finished (and also getting complimented on something you make works like a charm). Lately I have been doing a lot of sewing for the baby's room and drawing in my sketchbook.

Call a friend.

Tidy up! Organizing and cleaning my house makes me feel so energized!

Eat a piece of chocolate.

I would love to keep adding to this list throughout the month, so feel free to post any things that you do to get happy!


Wednesday, January 2, 2013

NEW GOALS FOR A NEW YEAR


After a recommendation from a friend's utterly adorable blog (harleyandjane.com, check it out!) I began reading The Happiness Project, by Gretchen Rubin. This book details one woman's yearly endeavors at making her life simply happier. She chooses 1 area of her life each month and focuses her attention on making that aspect of her life happier. Rubin is an upfront sort of writer and doesn't mind sharing her own failures and short-comings, which makes for a pretty enjoyable and motivational read. After beginning my own happiness project in December I decided to make several more goals to help me throughout 2013. This is what I came up with:


10 Things I Want to do in 2013:


1- Do one thing every day that makes me happy.

2- Develop an art-making routine.

3- Create weekly menu plans, and cook 4 days per week.

4- Work on the blog.

5- Become a mother.

6- Learn to share my accomplishments with others.

7- Ask for help.

8- Be kind to everyone.

9- Create a peaceful and stress-free home routine for me and baby.

10- Don't worry about things you can't control.